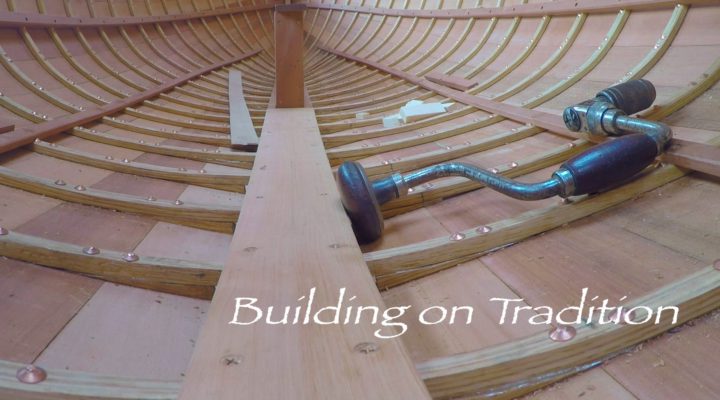
Wooden boat building
One of the most interesting things about boat building is that you’re literally breathing life into a pile of lumber, and making this beautiful creation that really does have a life, lives on the water.
Sam Devlin is an internationally recognized master boat builder, designer and teacher. His beautifully crafted wood boats ranging from 40 foot power cruisers to seven-foot dinghies have fulfilled the boating dreams of numerous people around the world.
In this video Sam shares his knowledge of boat building, to help you more easily fulfill your dreams of becoming of wooden boat builder.
Hi, I’m Sam Davlin. I’ve been a boat builder now for more than 20 years. And I’ve always used a boat building method called stitch and glue. What I’m gonna show you is an easy way, that with a minimum number of tools you can build yourself a seven and a half foot dinghy that we call the Polliwog, and I know you’re gonna be successful.
This is the Polliwog boat we’re going to build. She’s 56 pounds, she’ll carry two adults, she’s got a built-in stowage compartment in the seat, and you can fit her in the back of your pickup or even on your car top.
We’re gonna build the Polliwog using the ‘stitch and glue’ boat building method. It doesn’t require any molds, and simply all you do is cut out two bottom panels, two side panels to a specific shape, a transom. Then we’re going to clamp those panels together with wire stitches, that’s the stitch part of the ‘stitch and glue’. And then we’re gonna glue these panels together with epoxy and fiberglass cloth reinforcement. When we’re done we have a light, strong boat, just like the one here.
A couple of nice things about the Polliwog project is you can build it by yourself in a couple of weekends. But if you’ve got some family or friends that want to help, you» be able to have even more fun and you can help show them the joy of building boats. And it isn’t going to take a fancy tool list to be successful with this project.
These are the tools that we’re gonna to use to build this project: a circular saw, a handsaw, a drill, a block plane, a random orbit sander, a sheetrock square, a compass, a plumb bob, as many C-clamps as you can get, a chisel, a measuring tape, hammer, and a set of lineman’s pliers.
I’ve produced this video to show you how really simple ‘stitch and glue’ building can be. And I want you to be successful with your boat building projects. The best way to do that is to watch this video clear through from start to finish and get an overview for the whole project.
Yet later on you can go back and check specific parts of it for the details that you need, but if you just watch this video through you’ll get the idea of how simple and basic this process is.
Now let’s go to our blueprints and take a look at the specifics of this boat.
The blueprints of the Polliwog consist of about four basic pieces of information. One of them is the views of the boat: both a top view and a side view of the boat.
The second one is it has a materials list, and the materials list states which materials you need in order to build this project.
Third one is a parts list that says what each of the parts of this boat is and what they are made of.
The forth part is the actual panel expansions or the plates of the boat. This is the bottom panels and the side panels that are dimensioned.
And all we have to do to build this boat is to scale this up and to lay them out on our full-size plywood sheets.
Well, with that described, let’s go up and get our materials put together, and let’s start building this boat.
LOFTING
Ther that finishes the marking of these stations. Now, all I’ve done is I had hooked my tape measure over the edge of the panel, and across the length of this panel I’ve marked every twelve inches. Those are my station marks. And then I took my drywall square and I carefully hooked that over the edge of the panel, and I’ve drawn a perpendicular mark the width of this panel on each of these stations. I’ve also gone through and marked which stations are which, so, zero, one, two, three, four and those marks are identical with the marks that I have on my plans.
Now I’m gonna actually lay out the shape of these panels. This is the guts and this is the essence of lofting. And when we do this we use a simple rule that has been used for hundreds of years in boat building, and it’s called the feet inches in eights rule, and what that means is: you’re going to see three numbers ‘1 — 8 -2’. And those three number always correspond with the feet (is the first number), inches (is the second number), and 8ths of an inch 9is the third number). If I see a plus or a minus [ + — ] added on to that, that means plus 1/16 or minus 1/16
1 — 8 — 2 [+ / -]
feet inches 8ths 16th
So, if I look on my sheet of blueprintsand I check station 1, this is my bottom panel side, I see a number which says 1/8. If I hook my tape measure over the edge of the panel, I come in 1 foot 8 inches and two eighths of an inch, and I make a mark. If I check station number zero, I see it says ‘1;6;4’ , so, one foot, six inches and four eights of an inch. And I’m then continue duing that for all these station. There I finished driving all these nails on those marks that we made earlier on each of these station lines. Just lightly tap them into place I’m not trying to drive then through the plywood. Now I’m gonna take a nice straight grained piece of wood and fairly bendy piece. This is called a baton. It’a a little bit longer than the line that I’m gonna be drawing. And what I wanna do is I want to have it held up against each of these nails and bend around.
The easiest way to hold this baton in place is to just simply drive a small brad behind the baton.
I want to make sure I don’t drive it through the baton, because that will affect fairness of that curve, and we don’t want to wreck our baton for future work. Now I wanna make sure that I step back and take a look at the fairness on this baton. And what that simply means I want this to have no definite bumps in it, it has a nice sweep which mirrirs what we did in the plans.
And now if I place my hand on top of it, I don’t shift it out, a column when I’m drawing up against that my pencil quite vertical. I’m gonna draw a line which defines the edge of this panel in between each of these nails. And I’m gonna do that for the length of this side.
Well, now that we’ve marked out both bottom and our side panel and I’ve pulled the nails out there along my station marks, I now wanna cover what we’re cutting this boat up out of.
This is quarter-inch marine-grade plywood and if you will note this bottom panel and this side panel — if I lay two sheets one on top of another and I clamp them together very carefully, I can cut both of these bottom panels and both of the side panels out at one time. And I’m gonna do that, so, I’ve already put a clamp on the other end, I’ll clamp up this end, and then I wanna take a skill-saw and get it ready for the cut. You will want to set the depth on your skill-saw to where the teeth are just barely sticking below the depth of the plywood that we’re cutting. If it sticks down too far you’re taking a risk of having a kickback, and we don’t wanna do that. So, for safety sake just have your teeth just barely clear the bottom of the plywood.
I also wanna make sure that I put on a pair of safety glasses and I wanna put a respirator on, and as soon as I do that I’m gonna start my cutting.
I have found that you can cut around a radius with a circular saw by it lifting up on the back end of the saw and kind of attempting to scissor your way around the radius. Some people wanna use a jig-saw here, as it’ll cut around this radius a little bit simpler.
When you’re cutting with a circular saw be sure you cut to the outside of the line and then we’ll take our block plane and we’ll hand plane down to the line later.
You’ll have to use a hand-saw for this cut.
TRANSOM
Well, now I wanna show you how to lay out the transom. And what I did was I used a base line as a factory edge on the bottom of my plywood panel. And with a framing square I drew a centreline perpendicular to the base line. Then I needed a couple of heights, I needed a height at the chine edge which was three and a half inches, and if I measure up and make a mark on both sides then I can draw a line connecting it — clear through my centerline.
I need another point and that is shear, so, I’m gonna come up 14 and 3/8 of an inch, and I’m gonna make a mark on both sides of my centerline. And I’m gonna take a straight edge and draw a line through that also. Once that’s done I need my width, and my width would be measured from the centerline over. 20 and a half inches — make a mark, and 17 and three-quarter inches — and make a mark.
Then with a straight edge all I’ve got to do is connect those marks from the center line up to the chine mark, and from the chine up to the shear mark, and draw those in, and I’ll do that for both sides. When that was done I took some small brad nails, put one at the shear on both sides and one at the centerline, bent a butten into place, and marked out the crown I needed for the transom.
Well, we’ve cut out our two bottom panels, our two side panels, and our transom. I’ve got my two bottom panels in front of me. I’ve lightly clamped them together, and I wanna take a block plane, and work these panels down to my lofted fair line.
The sawcut could be a little uneven and I wanna make sure that I try to take the humps off and even out the valleys as much as I can from the unevenness of that socket. So, it’s best to stand back side, along the length of it and then with long smooth even strokes work your block plane down the edges of those panels. What we’re looking for here is symmetry between the panels. That’s the major important feature.
There, now I’ve planed and faired up the edges of my two bottom panels, my transom, and my two side panels, that fairing up hits the bumps into valleys from our saw cuts, and helps even and make things symmetrical. I’d also like you to note that I kept the edges square on my transom. I did not play in a complex angle on that. We’ll end up with a stronger joint in our transom doing it that way. We’ll set this aside now and I wanna pay attention now to the keel edge of my two clamped up bottom panels here. What I wanna do now is I wanna plane a 45 degree angle off roughly through the thickness of the fort of the quarter inch plywood on this edge and on this edge. And I wanna do that the legth of this panel that’a a non-critical 45-degree angle, but it helps gives us friction in the stitched-up keel joint and helps keep those panels in alignment, when we go to stitching them up later on. There, we’ve got our bevels trimmed and I’m gonna unclap my panels now, and I’m gonna reposition my panels so that our bevels are now on the inside edge, so, I’ll pull this top panel back, pull this bottom one up, and I wanna reclamp up the two panels so that they’re nice and square together again. That 45 degree bevels are facing interior now. There that finishes that up, now I’m gonna to turn the panels over, you pull them back to where I can work on this edge here. And I wanna move into scribing my stitch line. The stitch line is on the keel edge of the two bottom panels. And what that is is that’s the line on which we’re gonna have our small wire ties — the stitches that fasten these two bottom panels together. They’re gonna be all in line with that, and the rule is I wanna do the thickness of my plywood plus an eight of an inch. So, I’m gonna set cabinet maker scribe to 3/8 of an inch. And then I’ll scribe this keel edge of these two bottom panels. There, that finishes my scribe line there. Now I’m gonna pick up my drill and I’m gonna drill a series of holes along the keel edge, along this stitch line. Roughly two inches apart within about 3/4 of an inch of this bow, and within about 3/4 of an inch of the transom. Roughly two inches apart up in the bow sections, once you get passed the heavy band and curve in this bottom. Then you can move to roughly 6 inches apart in this straighter section where there is less strain on it. Now these holes are gonna be what we’re gonna place our little wire stitches into. So, now i’m gonna drill these series of eight inch holes the length of the panel. There, I finished drilling those stitch holes. I’ve set myself up with a small kit, I’ve got a lineman’s pliers, and some 16 gauge mild steel baling wire, and I’ve cut those to lengths of about five inches long. And I’m gonna place these wires in these holes and twist them up the entire length of this keel. Now those wires are simply a clamp to hold these two panels together in relationship until we get a chance to put our epoxy joint in them and bond them together. So, loosly i’m gonna twist these up and then I’ll come back and retension all of these wires the length of this.
What I’m looking for is enough tension to hold the two panels in close relationship to each other, not to snug as to cut into the wood itself when I spread these bookends apart. Now with all our stitch wires along the keel edge, tensioned, I now wanna stand the two bottom panels up, and I wanna spread them apart just like opening up a book. There’s gonna be a little creaking, and a little noise that’s gonna happen on this, but that’s just the wire stretching into the wood. now what I wanna do is I wanna spread this apart to about the angle that I anticipate the boat staying in real life, and I’ve got a short length of scrap wood about 20 inches long, and I’m gonna place that along this centerline of the boat, and with a short length of a wire I’m gonna stick around one of my wire stitches in the bottom of the boat. I can hold these two panels apart. Twist this wire up like so, and if I place the handles of my lineman’s pliers through there, I can twist this around and create a little Spanish windlass that will hold this spreaders ball in place.
Now my two bottom panels are held apart, you can see a little unevennesss in the keel line, where one panel is a little above the other — right here this panel is a little below and this is a little above. If I want to even that out, it’s easiest to take a hammer and just lightly tap alongside of that. That 45 degree bevel that we planed on the inside edge of these bottom panels aids us in that joint it gives it a little friction. This looks pretty good, I think I’m ready to go on to the next step. Now I want to prepare my two-side panels for placing on the boat. I’ve already clamped them together and if you would note I’ve already pre bevelled this inside face of the stem of the bow end of the boat and we flip-flop those so if they are inside facing now, just as we did in the bottom panel, and now we’re going to scribe their stitch length. I’ll set my cabinet maker scriber to 3/8 of an inch. And I’ll start at the bow and work my way after. I’ll finish up up here in front of the transition joint. Now I can take my drill and I’ll drill a series of stitch holes or pre drill a series of stitch holes through both of the panels at one time. I’m going to come up forward about an inch and a half in front of the transom, so I’ve got room to place the transom in, and I’ll drill a litlle series of holes. I want to go about two inches apart at the ends of the boat, and in the middle of the boat I can spread it out to about six inches apart. (Sound of drilling)
ATTACHING SIDE PANELS
Okay, now I’ve prepared my side-panels to go on to my bottom panels. This is the transition notch up forward here and, as you can see, it lays up on top of the bottom panels in this forward seven inches or so. And then it runs down alongside of the bottom panels of the balance of the way.
What I’ve done is I measured back simply the length of this notch. Using my handsaw I make a small saw cut. Then with my chisel I chisel at the same angle as the side lays in relationship to the bottom. i chisel up into that saw cut. Next I’ll take my block plane and I finish up the rest of that bevelling on the chine clear back to the transom.
Well I brought my son Cooper in to give me a hand, stitching these side panels onto the boat. This is one of the areas that are real… it’s really helpful to have a helper, assist you, because what you have to do you have to keep this panel held very close and tight in relationship to the bottom panels. As we’re stitching it up he can move the panel up and down and in and out as I’m moving along, and that really helps me a lot. So let’s go ahead and start fastening now.
There, I’ve already fastened my sides onto the bottom of the boat, and I’ve now placed two wires on my transom that are helping me stitch that in relationship to the bottom of the boat. I wonna make sure that I keep my orientation of my centerline pointing straight down and directing into the keel line of the two bottom panels. I don’t want to let it shift to either side. Next I’m gonna place a wire about half way out on the bottom panel and another one out towards the chine edge of that. I’ll stitch that side to the opposite side, then I wanna place a wire at the lower edge of the side panel and one up at the top here and I’ll do the other side. When I am satisfied with that layout I’m going to move on to my next step.
Well, now I’ve got, as you can see, my sides of wood stitched on to my bottom panels, my transom is stitched into place. The boat is still not quite looking like I want it to look, but nonetheless we’re stitched up and I’m pretty happy with it. The next step is putting the spreaders in place. From your plans they’re going to give the locations on them and what they do is they really open up the magical part of stitching glue boat building. And that is this is when the boat really springs to life. For me it really starts looking like the boat I really had and visioned in my mind… Put another one up here… Now I wanna step back and I wanna take a look at this boat and see that shape, and see what I’ve really created here. And I’m happy with it. So the next process is I wanna check for squareness to make sure that before I epoxy tabbot, that I’m happy with everything I knew the way I do that. So, take my tape measure, hook it over the stem and I draw it back diagonally to the corner of the transom. This dimension should be the identical to the one on the other side. if it’s not I can adjust it by shifting the transom a little bit by pressing up on one side and down on the other side. But if those dimensions are identical, then I’m ready to go on to epoxy tabbing.
Well, welcome to epoxy central. over here I wanna discuss the epoxy resins, that we’re going to use to bond together our stitching glue boat. I’ve got resin and I’ve got catalyst, and I’ve got some other stuff that’s going to help me handle this epoxy resin. I wanna touch in safety now, you need to keep epoxy resins off of your skins, what’s gonna help you do that as disposable safety gloves, a respirator to keep you away from the minor amounts of fumes that they have, some safety glasses in case the epoxy splashed up during the mixing process, those are all going to help. If you get epoxies on your skin you wanna make sure that you get your gloves off, use some waterless hand soap and get yourself cleaned up. What you need to avoid specifically is using aggressive solvents to do this, you don’t wanna use lacquer thinner, acetone or any of those types of solvents to try to clean this epoxy off your skin. They tend to strip the oils off your skin, and you have a lot of your own personal protection is based on those oils in your skin. So, don’t use those solvents, use just waterless hand soap and clean yourself off.
Now, every epoxy manufacturer is going to have a different mixing ratio that they’re going to recommend. In the case of this manufacturer this guy wants two parts resin to one part catalyst. Okay, I can arrive at that ratio two different methods: I can either use metered mixing pumps, which I have here, or I can use a graduated cup, and I can literally measure the amount of resin to catalyst in the proportions there. So, as long as I’ve got that proportion mixed properly, then the next thing I wanna cover is actual mixing of the epoxy itself. What you wanna make sure is you stir the epoxy up very well, scrape off the sides of the container, scrape off the bottom and then mix it again, you literally cannot mix it too much. Once I’ve got my mixed epoxy and catalyst and it’s stirred up, then I can add my filler materials. and in this case I’m using wood flour, and wood flour is particularly nice for this kind of process because it’s wood colored , the density is very similar to the density of the wood itself, and I think it makes a very excellent filler material. I’ve mixed this to a rough peanut butter consistency, ans as you can see it’s not really dripping off of my stir stick. What I’m going to do now is I’m literally going to tack weld the boat together, I’m gonna place a small fillet of epoxy and wood flour in between each of our wire stitches that are holding the boat together right now. And I’m gonna let that cure up overnight, and tomorrow morning we’ll come in and I’m gonna to pull the wire stitches out and then we’ll proceed to finish welding the boat together with our epoxy resin and glass cloth. So, I’ll put my mask on and we’ll get going.
Well, I’ve let my fillet material cure overnight and you can see all the wires that held this stitch and glue boat together. To get the wires out I first untwist each of the stitches, then with my pliers I trim off the excess length of wire sticking out of the joint. Then, using my pliers like a lever, I clamp on to the wire and I roll the wire out of the joint. If I’ve got a little fillet material on the inside of the wires with some epoxy I can heat release that with… by using a propane torch, and that will cause the wire to be able to come out.
Now that I have all the wires out I’m gonna to sand all of the joints of this boat and smooth down my fillets, so that I’ll have a nice clean area to work in. Now I’m ready to glass the interior seams of the boat, I’m gonna use six ounce by four inch wide fiberglass cloth tape, roll out the tape and measure the lengths that you need for each of these joints. Now I’m painting out all the joints that I’m bonding with about a six inch wide band of mixed epoxy resin, that’s to allow the epoxy to soak into the wood as much as it wants to give me a better bond for the glass cloth. Using my fillet material I’m now paddling the material into the joint to make a nice smooth even cove. Next we lay out our first pre-cut layer of glass tape into the fillet material and smooth it down. Next I paint the first layer of glass tape with epoxy resin, saturating it until it’s clear. You’ll want to stagger the second layer of glass tape so that it overlaps the first layer. Now I’m saturating the second layer of glass tape with epoxy resin just as I did in the first. The third layer of tape, once it’s set into the joint, won’t require much epoxy to saturate it, because it absorbs the excess epoxy from the other layers. You wanna make sure that you get all of the air bubbles possible out of the glass tape by smoothing it out or coaxing it with your brush.
After the my epoxy is cured on my interior taping I want to come in and with 80 grit sand paper I wanna lightly feather the edges of that glass tape, and I wanna knock the sheen off any epoxy surfaces. //**31-28